

As you might expect, painting a tank company to this standard isn't particularly time consuming (each tank took about as long as one of my Dark Angels space marines I reckon). But, the shift from GW games to historical led to a quite remarkable amount prevaricating about paint schemes and tank numbers. Which paints to use? Which colours? Which weathering products? Which decals? Brush or airbrush? All fairly entertaining questions to ponder, if quite expensive, and ultimately I came to the conclusion that whatever I did I wouldn't be able to produce a historically accurate colour scheme. Or, to be more precise, I came to the conclusion that I didn't have the knowledge, the energy, or the skill. What with a the fairly limited quantity of decent colour photos, almost no visual evidence of the two-tone colour scheme meant to be used in North Africa, 'scale effect', paint fading in the desert sun and getting blasted by sand it all got a bit confusing. In the end I went for a scheme which I thought looked good and was reasonably close to the various sources I'd found.
Before I came to this conclusion I spent days online reading about other people's armies, tried out six paint schemes, broke my rubbish GW 'airbrush', abandoned my attempt to use AK Interactive's DAK paint set, doubled the size of my (still unused) collection of weathering powders, tried using fixing solution for weathering powders (and didn't like it), discovered that Battlefront's decals don't fit their tanks, and that Dom's Decals are excellent but that they need ordering well in advance.
Finally I settled on the following paint scheme, there are a few steps but they're all quick to do.
- Undercoat in Halford's Grey Undercoat
- Basecoat Vallejo Iraqi Sand thinned 50% with Vallejo thinner (I did this with a brush but I'd have happily used an airbrush if I could have got mine to work)
- Wash entire tank with thinned Agrax Earthshade (50/50 with water)
- Paint tracks Vallejo hull red.
- Wash tracks with Badab Black
- Drybrush tracks with Vallejo Oily Steel
- Tidy up tank body with Iraqi Sand
- Hard edge highlight body of tank with Vallejo Ivory
- Wash tank with GW Sepia Wash (50/50 water)
- Paint rubber wheels black
- Highlight black sections with Vallejo Black Grey
- Paint chips applied to edges (Hull Red/Black mix applied with torn bit of blister pack foam)
- Wood: Base = Scorched Brown,
- Varnish GW brush on Ardcoat
- Add decals (Dom's decals)
- Very light drybrush of the decals with Vallejo Iraqi Sand
- Spray Matt Varnish (I used Humbrol acrylic spray, it seems to have worked but is very slightly dusty which, thankfully, is pretty appropriate).
That gets them looking like this (though perhaps not quite so yellow):

Here's mini-Rommel:

Some lessons Learned
Decals: The BF ones were too large and not of a very high quality. Dom's Decals are great (but order in good time, delivery took a week or two in both cases). And - Red decals don't show up all that well over desert paint schemes, I ended up removing all of the turret numbers and redoing them (oddly it was Microset that was recommended for this rather than Microsol). If anyone wants to know, the numbers I used are from Dom's 10/12mm range. Despite shifting to smaller decals I couldn't get three numbers on the turret so I shifted allegiance from the 21st Panzer Division to the 15th who have a far more sensible single digit system! In order to make it easy to distinguish between the various units I went for different markings on the rear of the turrets which is fairly subtle but hopefully will be helpful when I finally get a game in).
AK Interactive Paints: I was very excited about using these but didn't really get on with them. They're very shiny, presumably in order to aid the later stages of putting on filters/washes. If I had more time and skill I'd like to give them a go (the guide to painting DAK on their website is amazing but was beyond my ambition, though at the time of writing their blog where it was posted seems to have disappeared).
Weathering Powder: Despite buying a fair number of these and some fixing solution, I didn't bother with it in the end. The powder tended to disappear under varnish and a quicker, but similar, result could be had with a bit of very light drybrushing.
Magnets: I magnetised the turrets (it was easy enough to drill holes out of them with a basic electric drill). If I did this again I'd use much smaller magnets for the armoured cars, it's very hard indeed to move those turrets around.
Paint Scheme: My one regret is that I didn't find a satisfying two-tone scheme which would have brought the tanks in line with the official DAK scheme for the period. That said, I've not found any very good examples of this (in terms of historical images or pictures of models) and my story here is that the desert sand has covered/removed the secondary camouflage colour (light grey)!
Terrain
Until I started this project I didn't own any desert terrain (though I did have a sandy-coloured set of boards for the table). I made the decision that my time-to-money ratio validated buying some Battlefield in a Box terrain and ordered myself a couple of hills, some buildings, an oasis and some desert obstacles. To my relief they look very playable to me. Certainly as good as anything I could have made/painted and at a price that's pretty close to GW's unpainted terrain. Only the palm trees look like they could do with a bot of attention. Looking at the various UK distributors' websites it looks like this stuff is going oop so I'm glad I got hold of it. Spread across a 6x4 table it looks like I might need to get a few more bits ordered:
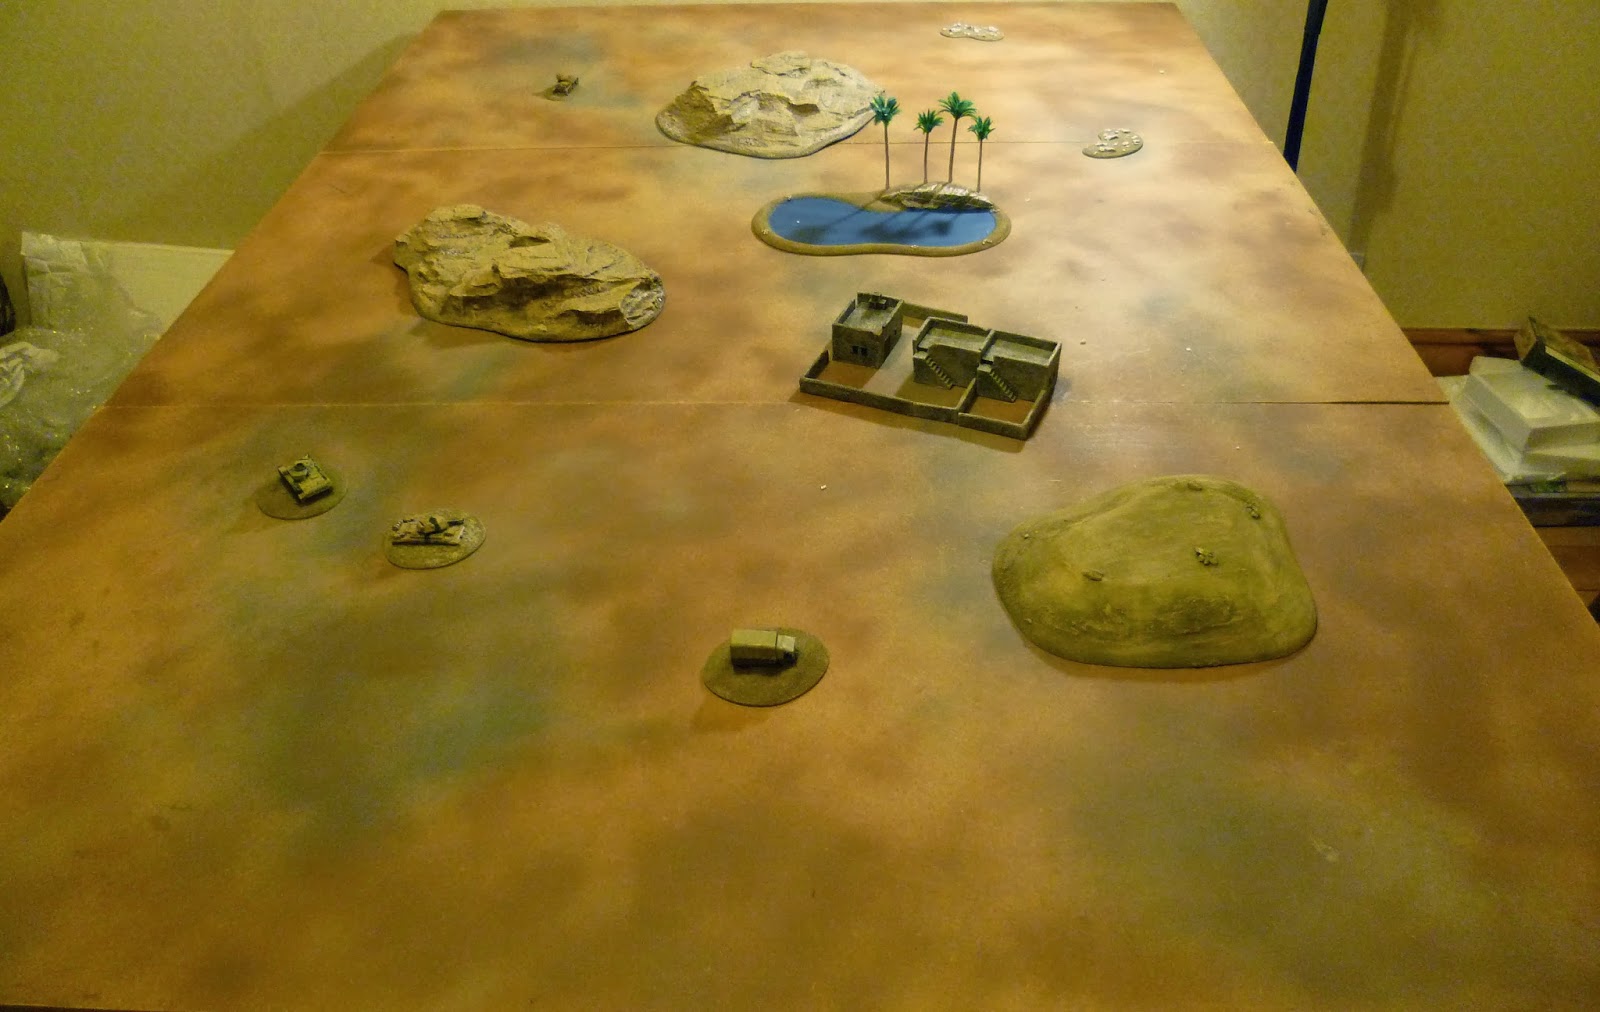
In an attempt to supplement this I made some sand dunes out of some old GW hills. they started life looking like fuzzy-felt mounds.

I peeled off the grass (which was surprisingly easy and which kept my two-year old entertained for 20 minutes) and added some fine sand and rocks. When that dried I sprayed them with Battlefront's German Armour Desert (which I'd rejected as a base coat for the tanks) and then drybrushed them with Vallejo Desert Yellow, Sand Yellow, Dark Sand and Iraqi Sand. Finally I added some water to the brush to smooth things out a little. They ended up looking close enough to the Battlefront terrain for my purposes.

Next on the painting table it'll be either some Perry Miniatures DAK or a Dark Angels tactical squad. It really should be the latter but I'm not sure if I can resist building the DAK infantry...
No comments:
Post a Comment